My Smile Journey

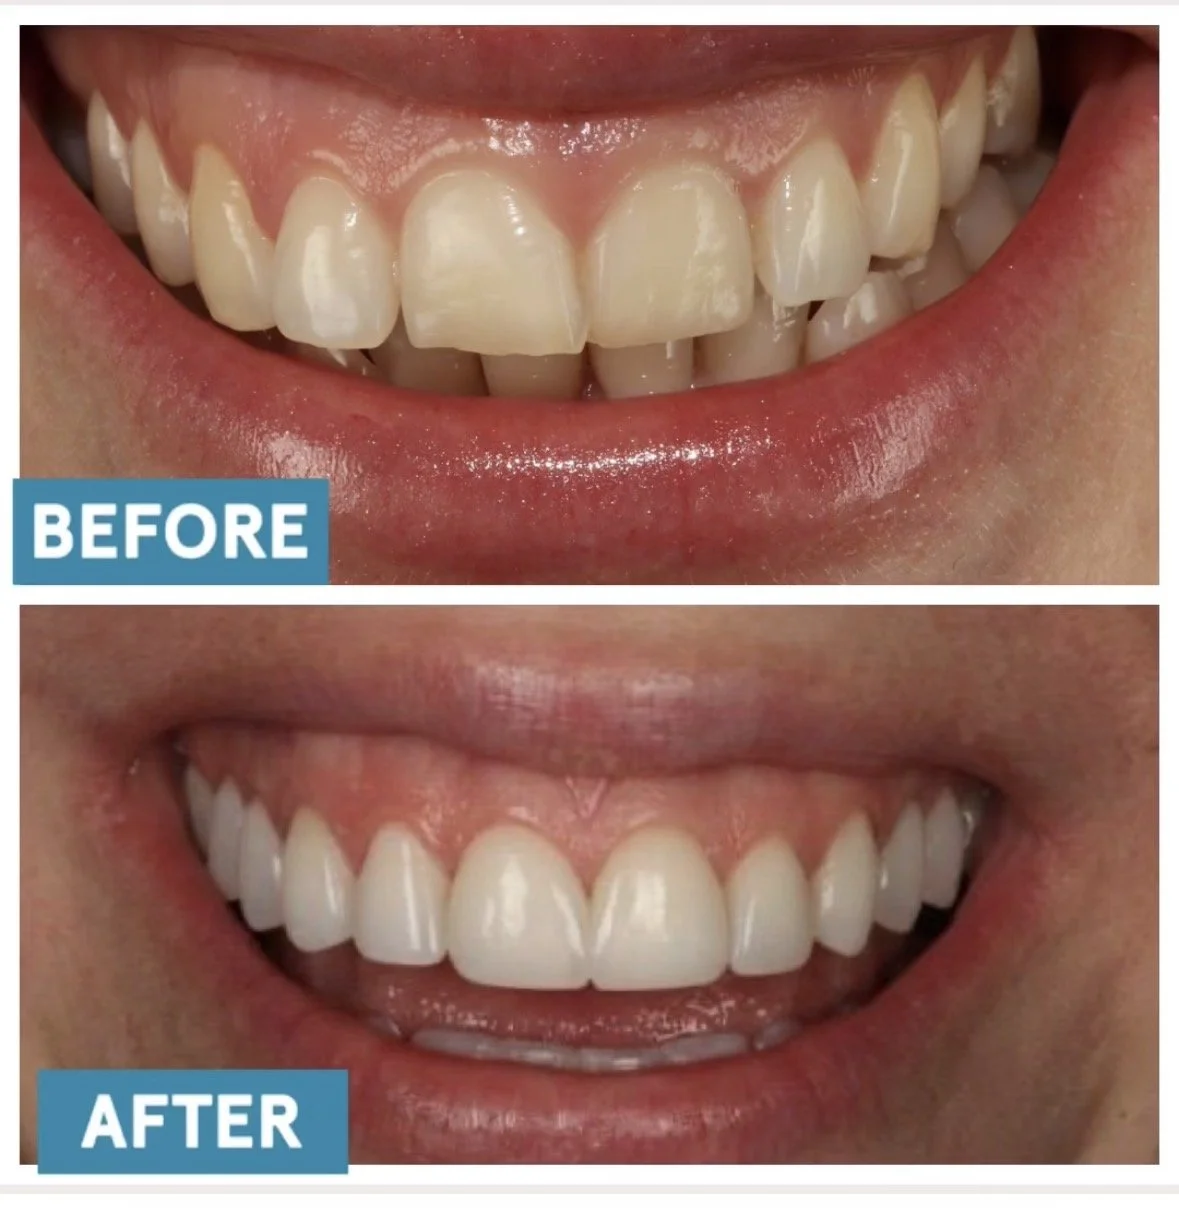
Five years ago, I decided that I wanted to upgrade my teeth. I'm in front of a camera a lot, and my not-so-pearly whites were the only things that annoyed me. I had noticed them crossing over more and more over the years, the edges were uneven, and they weren't as white as I would have liked. So, I looked into Invisalign...
Let’s cast our minds back to February 2020 (remember that year? Lol), I began my Invisalign journey with the incredible Dr. Rhona Eskander of the Chelsea Dental clinic. Firstly, let me tell you a little bit about Rhona: she’s far more than a dentist — she’s a trailblazer in the dental industry, setting new standards in cosmetic dentistry, sustainability, and patient care alike. She is multi-award winning and her beautiful clinic has a six-month waiting list for a reason. Basically, she’s the best.
In this blog post, I’ll tell you everything I can about my procedure from five years ago, as well as everything I had done last month — from the timelines to the cost, to the revelations that are “contact lens veneers” and “gum removal”. I promise: all of your questions will be answered.
Firstly, I have to admit, my teeth weren't crazy “bad” before my initial procedures, which is why the entire process was quicker than most. Invisalign took just six months to work its magic on me. Lockdown also expedited things. Rhona gave me all of my trays during my last appointment on the 23rd of March. I was actually sitting in her clinic when I watched Boris's lockdown announcement! I was very lucky to be able to get my entire pack of aligners that day. Rhona also decided to file in-between my teeth during that appointment to make space for them to move. She would usually have done this a few weeks later, but we didn’t know when we’d next be able to book an appointment. This turned out to be great as I could then just get on with my treatment at home while the world went to pot.
Being in lockdown meant that I strictly followed the treatment plan and its rules. I'm pretty sure this wouldn't have happened under normal circumstances, but lockdown meant I wasn’t eating out, and I was always at home to easily brush my teeth whenever.
The first appointment and what to expect
Your first visit is pretty quick and straightforward. Your teeth are scanned with a nifty device to show you a digital before and after, and to measure up your aligners. This didn't hurt at all. Then, it's not until your next visit that you get to see the potential results. During my own first appointment is when Rhona told me that my teeth were about a third shorter than they should be. This was due to two things: firstly, as a child, my teeth didn’t grow out of the gum as much as they should have. This actually happens to many people, apparently. The second cause was from grinding my teeth over the years. I didn't even know I did this, but it turns out that it’s extremely common at night.
The second appointment
My second appointment was just a couple of weeks later. Here I picked up my first aligner trays — just two sets — which I would wear for four weeks to get used to them.
These were the rules I was given:
Wear them for 22 hours per day.
Clean your teeth after every meal.
Floss every other day.
Take them out every time you eat and drink, but it’s okay to keep them in when drinking water or anything clear. (My gin collection became exceptional during this period!)
Clean the retainers each night with your toothbrush.
This is how much I managed to stick to the rules, realistically:
I reckon I wore them for 20-22 hours a day. This seemed fine but remember, if you don't follow the rules properly, it might delay your treatment.
I brushed my teeth twice a day, and after lunch if I was at home. After eating I always rinsed my mouth with water and that seemed fine. Obviously, due to the lockdown, I was at home a lot, so brushing them was a lot easier than if I was at work.
I flossed and used a Waterpik, which I highly recommend! It’s almost like double cleansing your teeth.
On my first day, I forgot to take them out when I drank a green tea and they turned green! They stained green for the whole two weeks! So deffff take them out when drinking anything that's not clear. Lest you fancy adding a certain je ne sais quoi to your Halloween outfit or something…
The third appointment
This was when I got the bumps on my teeth. What I mean by “the bumps” is these tiny tooth-coloured bumps that are bonded to teeth using dental composites. They are placed at precise locations and allow the aligners to grip your teeth while they guide them to their new locations. So, they basically speed up the process and make sure your teeth move correctly. They are barely noticeable when the retainer is on, more so when it’s off. This picture is without the retainer:

Pain?
Lots of people asked me about the pain. Obviously, there was some discomfort when I changed the retainers as they got tighter each time. I changed mine about every two weeks, though sometimes every eight to ten days if I felt like they were loose and weren't working anymore. My tip would be to always change them at night so that you’re asleep during the most painful first few hours. Occasionally, I would take two paracetamols (always read and follow the instructions) when changing them to ease the slight pain. By the morning, I’d feel fine. In terms of pain and irritation, the process was actually a bit more annoying when the aligners were off, because the bumps would rub my gums and feel sore or cause the occasional ulcer. Make sure you always have Bonjela to hand! Also, remember that my teeth weren't that bad, so it might be more uncomfortable for you if your teeth need to move more than mine did.
The magic
This is the best bit — the magic! Honestly, I could see a difference after week two. It was amazing and I couldn't stop staring at my teeth. The fact that you can see the process working makes all the hassle worth it. Take pics every time you change your aligner so you can track the difference.
Six months later
I couldn't physically go and see Rhona during my treatment, so we would Facetime every couple of months for her to see my progress. Once I had finished my aligners and lockdown was over, I went in for my next appointment.
The fourth appointment
This was an exciting one as this is when the bumps were removed and I was given a whitening kit. This was done by the amazing Sarah Macdonald on Rhona's team. She is an Orthodontic Therapist and is highly talented, as is the entire team at the clinic, (which, by the way, is made up of mostly women!).
It was easy and pain-free to take off the bonding; it just pulled slightly which wasn't a big deal. Sarah gave me the whitening kit and told me to use it for two weeks, followed by a two week break before my final bonding appointment. This let the whitening settle.
She gave me the Boutique Whitening Kit, (always speak to your dentist before using), and explained that I should use it overnight in my aligner, and that there may be some sensitivity.
I could not believe the difference of colour in my teeth. You guys noticed it straight away! I was so lucky not to have any sensitivity, but I can also bite into an ice lolly with no worries (unhinged, I know), so I wasn't too surprised. After two weeks, my teeth were gleaming and straight, albeit short, which was more obvious now that they were straight. I kinda felt a bit like Ross from Friends — remember that episode?! But I loved the outcome nonetheless.
The bonding
Fast forward four weeks and it was time for my final and most exciting appointment. It was bonding day! By “bonding day,” I mean it was time to build up my teeth with composite bonding. This is a great alternative to veneers, as your natural teeth aren't shaved down. Dr. Rhona is known for her natural bonding skills. Trust me, this is a skill that is pretty rare. So, do your research before getting this done.
When I arrived, I had my teeth cleaned by the clinic’s brilliant hygienist in preparation. Next, Rhona placed a contraption into my mouth so that no water could get onto the bonding while it was setting. I'm not gonna lie — it wasn't comfortable. She also numbed my gums with local anaesthetic so that I couldn't feel anything, which felt weird. The bonding sesh took about 90 minutes. It obviously didn't hurt because of the numbness, but it was… odd. I just lay back on the chair and closed my eyes and took lots of deep breaths to keep calm.
Once the bonding was done, Rhona lasered my gums. She did this to make my teeth look slightly bigger and more even as I had quite a gummy smile. This sounds scary but I couldn't feel anything — though it didn't smell very nice, as you can probably imagine! My gums were slightly sore and red for a couple of days, but nothing major. When you read about my most recent dental work, you’ll learn about a more permanent version of this gum treatment.
The results
When I first saw my new teeth it was amazing and strange. At first I felt they were slightly too big. Remember, my natural teeth were a third too short due to grinding and genetics. Rhona shaved the bonding down slightly but then asked me to live with them for two weeks to see if I got used to them, as the sizing was now as it should be. It took a few days, but once I got used to them, I realised how incredible and how natural they looked. Dr. Rhona is a true artist and also one of the kindest people you'll ever meet. I feel incredibly lucky to have had her as my dentist. She has really transformed my smile (and confidence!).
The final steps
After the bonding, Sarah put the permanent retainers on the back of my teeth to stop them from moving back. A permanent retainer is a thin bar of metal that you can't see, placed behind your teeth. You can feel your permanent retainer, but you forget about it after a couple of weeks.
Two weeks later, I headed back to the clinic for one final check-up, a polish, and to get my nighttime retainers, which you should wear every night forever. Though you do need to change them yearly, which feels like a small price to pay for perfect teeth!
I asked you guys what else you wanted to know from Dr. Rhona, so here are some quick-fire answers:

What does bonding involve?
“Isolating the teeth with rubber dam. Using an etch also known as a phosphoric acid on the teeth. We then use a primer and bond which is like the glue. The resin comes in various shades of white and is matched to the teeth before being applied. The artistic ability of the dentist determines the outcome. The straighter the teeth are, the better. Crowded teeth can mean thick, chunky bonding.”
What is the average cost for Invisalign and bonding?
“Invisalign costs £3000-£6000, depending on the case. Bonding is £450 per tooth. You usually need six to ten teeth bonded.”
What is the best at-home whitening treatment?
“Boutique Home Whitening. We take scans of the teeth to make specific whitening trays, or we allow you to whiten in the Invisalign trays towards the end. Boutique has a unique hybrid formula which is very effective. Philips Zoom is also excellent. With this we offer chair-side sessions with your dentist involving a light or home whitening. All systems are based on peroxide which is the key ingredient to give the best whitening results.”
How long does bonding last?
“Two to five years. It all depends how well you look after it. For example, your diet is key. Bonding can also pick up stains with red wine, smoking, etc.”
Once finished with Invisalign does it last forever?
“No. Unfortunately, teeth always move, so it is imperative to have a fixed retainer and nighttime retainers to try and keep the teeth in place.”
Does it hurt?
“There is some mild discomfort that you get used to. Changing the aligners can cause some discomfort as they are new. It’s more of a pressure than a pain.”
Can you just have Invisalign on either your bottom or top teeth or does it have be both?
“I always advise both. Teeth work in pairs. You want to ensure that the bite you create is working for both the upper and lower teeth.”
Do the cheaper retainers we see online and on TV ads actually work?
“I can’t comment specifically on a brand but I would never recommend not seeing a dentist. Patients are left to their own devices to take their own moulds at home. Many can’t and don’t do it accurately. If you have a problem, it’s very difficult to reach someone.”
If you have very crowded teeth, how does it work? Do you need some removing first?
“This totally depends on the case. Some cases just need IPR, which means doing some filing between the teeth. This removes enamel between the teeth and creates room for the teeth to move. In severe crowding cases teeth may need removing. In some cases, if you are happy with an improved but compromised result without taking out teeth we can get away with IPR. Your dentist can show simulations of how the teeth will look with or without extractions.”
Why do you laser gums?
“The height-width ratio is key to creating beautiful teeth, so sometimes it means making the teeth bigger from the top. Often people don’t realise that gummy smiles can be corrected by removing gum tissue. Moreover, if you have a high smile line where the muscles are hyperactive, you want to make sure the gums look even and symmetrical to create a beautiful smile.”
What’s the best way to clean in-between teeth when you have a fixed retainer?
“Tepe brushes or single tufted brushes.”
Do you file teeth down for bonding?
“No. But when bonding is removed or repaired the drill will most likely cut your teeth. It’s not totally reversible as people think.”
What’s the average time scale for Invisalign?
“One year.”
Now, we’re fast-forwarding to December 2025. As Dr. Rhona mentioned, bonding lasts for two to five years. I’ve been lucky enough to have mine for five years, so now was time for a review. However, Dr. Rhona brought some other treatments to the table too, as technology and treatments have developed over time. She suggested that I have a Gingivectomy — which is a permanent removal of the gum, as mine had grown back over the five years — with contact lens veneers on four of my teeth. These are SO cool and have made a massive difference.
Here’s Dr. Rhona’s reasoning behind creating my new, dream smile:
“When we first did your bonding, it was designed to be a conservative, flexible solution. Composite bonding isn’t permanent — it’s expected to need refreshing over time due to normal wear, small chips, staining, or changes in your bite and facial structure.
“Five years is actually a very normal and appropriate timeframe to reassess and refresh bonding, especially when you want things to continue looking polished and balanced rather than simply ‘good enough.’
“Refreshing the bonding allows us to:
• Restore smooth edges and shape
• Improve colour stability
• Refine proportions as your smile and face have changed
• Maintain a high aesthetic standard without over-treating
“In addition, we introduced non-prep contact lens veneers on the back teeth for a very specific reason: when you smile, it’s not just the front teeth that matter. The teeth further back help support the lips and create a sense of width. If those teeth are narrow or sit further in, the smile can look smaller or darker at the corners — this is what people refer to as reduced buccal corridors.
“By placing ultra-thin, non-prep veneers on the back teeth:
• We enhanced the natural width of your smile
• Improved how light reflects across the smile
• Created better harmony between the front and back teeth
• Did this without drilling or damaging healthy teeth
“Think of it like framing a picture: the central image might be beautiful, but the frame determines how it’s perceived. Refreshing the bonding and subtly supporting the back teeth allows the whole smile to look more balanced, natural and cohesive — not ‘done,’ just well designed.
“The goal wasn’t to change your smile dramatically, but to maintain it at a high level, using the least invasive and most thoughtful approach.
“These ultra-thin veneers are what many celebrities are going for now. Think of them as the new Hollywood smile. Here are a few examples:
✔️ Zoe Saldana – known to have very natural ultra-thin veneers
✔️ Emily Ratajkowski – reported to prefer minimal prep veneers
✔️ Margot Robbie – often mentioned in cosmetic dentistry circles for conservative veneer work
✔️ Kendall Jenner – her famous smile is often attributed to ultra-thin conservative ceramic restorations
“Re your gums, we have the incredible specialist, Dr. Mitul as a resident in the clinic. He is the best in the business. When you first had a gingivectomy, the aim was simply to remove a bit of excess gum to show more of your natural teeth. At the time, that was a reasonable and conservative approach. However, gums don’t exist in isolation. They sit on top of bone, and your body is biologically programmed to keep a certain amount of space between the bone and the gum edge so everything stays healthy.
“Because a gingivectomy only trims the gum tissue and doesn’t change the bone underneath, your body effectively tried to “correct” things over time. That’s why the gums gradually grew back or became uneven again — it’s not a failure, it’s a natural healing response.
“This is where crown lengthening is different. Crown lengthening carefully repositions both the gum and the bone underneath. So, the gum line sits in a place that your body is happy to maintain long-term.
“By addressing the foundation rather than just the surface, crown lengthening:
• Creates a stable gum line
• Reduces the chance of the gums growing back again
• Improves symmetry and tooth proportions
• Keeps the gums healthier around restorations
• Gives a result that’s designed to last, not just look good initially
“A helpful way to picture it is by seeing the first treatment like trimming a hedge, whereas crown lengthening is like resetting the soil level so the hedge grows properly and stays in shape.
“Now that we’ve seen how your gums respond over time, crown lengthening is the more predictable and biologically correct solution for you moving forward — especially if we want a result that stays stable and healthy.”

So, yes, here I am now with my absolute dream smile. I can’t tell you what a difference this has made to my confidence. I’m so grateful to Dr. Rhona, Dr. Mitul and everyone at Chelsea Dental Clinic. It was worth every penny, and if this is something you have been thinking about for a while, I would highly recommend that you book in with the team and have a chat about how this would work out for you. Yes, it’s a process, but one that is totally worth investing in if you ask me.
If you have any more questions, feel free to comment below and I’ll ask Rhona to answer them for you.
Love,
Lisa xx